

I may be a writer but I love using visual cues to organize my writing. I really like and have used index cards to arrange scenes and beats, but that usually requires physical items. I know you can have virtual index cars in Scrivener, but in Scrivener 1 on Windows we’re still limited to keeping the cards in strict rows and columns. On Mac, and in Scrivener 3 for Windows (releasing… eventually…) you can arrange the cards in any position you want.
Outlining and Structuring – Freestyle with Freeform Mode on the Corkboard from Literature & Latte on Vimeo.
The Scrivener corkboard isn’t perfect, of course. But I I’ve found something that includes a lot of the good points and adds a few extras: Microsoft OneNote.
What is MS OneNote?
MS OneNote is part of the Office suite, and if you have Word chances are good you already have OneNote. (If you have Office 365 you can even add the apps to your mobile devices to reference and add to on the go.)
Basically, OneNote is a relatively free-form note-taking program. You can position text anywhere you want, add basic drawing elements, insert images, and even add list and checkbox functions. The workspace expands and contracts according to the content, so if you need to go wider or longer you can. Very versatile.
Getting a visual timeline of multiple POVs
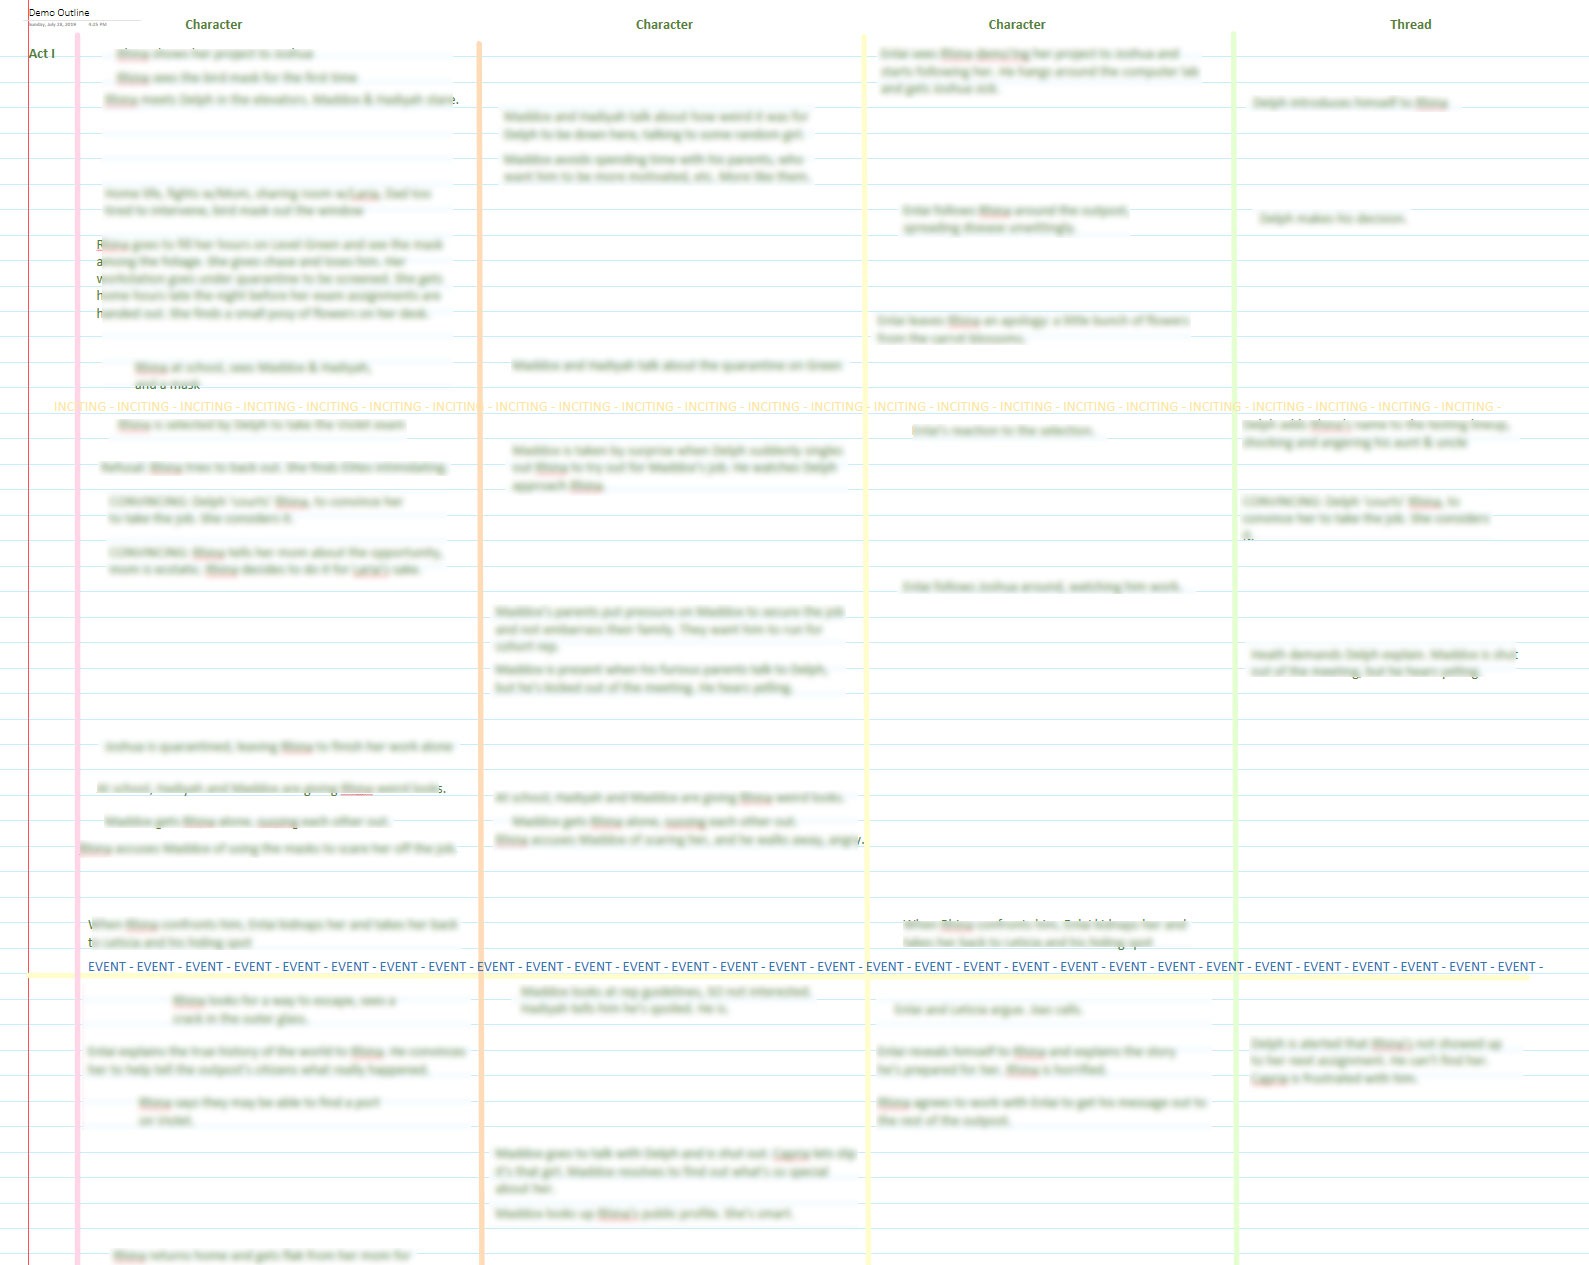
My challenge for the current WIP was not an easy one. It has 3 POVs and a fourth important character. I wanted to have a chronological timeline for each and see where they intersected, make sure I hadn’t forgotten someone, etc.
Usually that would mean index cards (or other small pieces of paper) spread across a large surface. But inspiration struck—I could try it in OneNote!
I ended up with something like this:
Setting up my outline
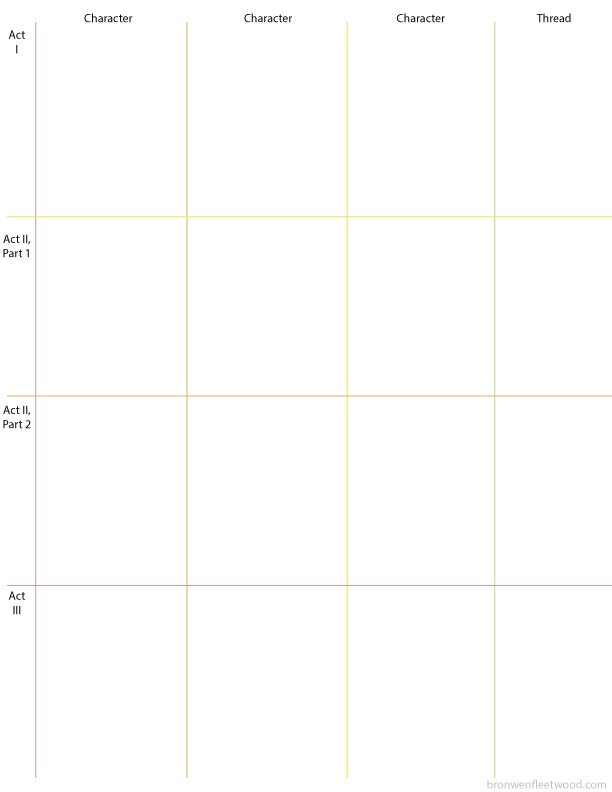
I used the draw tools to create straight lines, and set up four columns, each with a label. To help orient myself as it got bigger, I color-coded the lines. I started with red on the left, and moved through the rainbow toward purple. (I thought I’d need more columns than four.)
I also drew horizontal lines to differentiate the novel’s acts (Act I, Act II-Part 1, Act II-Part 2, Act III). I used color-coding on those lines as well, moving from yellow to orange to red to indicate intensity as I did in The Monster Novel Structure Workbook.
Thanks to the color coding I knew I could zoom in and out and always have a visual cue reminding me where I was.
I started on a blank white background, but quickly realized I wanted even more rows to help me line items up. Luckily, OneNote has lines built in! In Office 365 you can go to View > Rule Lines and select the line density. The result looks like a standard piece of college-ruled loose-leaf paper.
Adding Events
With those visual guides in place I could add my events. It’s as simple as positioning your mouse and clicking to make a new text box, which you can then resize.
Using my lines as reference points I started dropping events into place.
Any time things got cramped, I used the Insert Space function (Insert > Insert Space) to add vertical space. There’s no equivalent for horizontal space, which is a pity.
Handling events common across columns
Sometimes an event impacted more than one character. I had two methods for this.
The first was just to copy the text and paste it into the second character’s column. Often I’d want to tweak it slightly to reflect the way that character experiences the event.
The second was to make a long text box that stretched across all the columns and fill it with repeating shorthand text. The text might be a story structure beat (“INCITING INCIDENT”) or it might be the nickname for the event (“THE PARTY”).

In the image above I know I’m looking at the major event that is also the Turning Point 1 between Acts I & II (the horizontal line is yellow) and I know I’m looking primarily at the first two columns of content (the vertical lines are in rainbow order from left to right, starting with red/pink).
Selecting scene order
Once I had all my events arranged chronologically it was time to select what order they would appear in the novel. I printed the outline (do File > Print > Print Preview to play with print options like landscape or portrait) and used a pen to number the scenes. I could have done something similar in OneNote, but the printout allowed me to see the big picture and the pen felt more natural. Using the pen also allowed me to be looser in how I split the scenes/beats. I could choose which POV I wanted for each part of a given scene.
Adding to Scrivener
Satisfied with the arrangement, I moved back to Scrivener and created a scene card for each scene and/or POV change. There’s no fancy trick to this, you can copy and paste the text boxes directly or retype. And I’ve talked before about how I use custom icons to mark POVs in Scrivener.
This whole process took a lot less time than I anticipated, and it was a lot neater than spreading out index cards in the same pattern. Definitely a tool I’ll keep in my toolbox for next time.
Have you ever used OneNote for writing? I’d love to hear about your experience!
